スポンサーリンク
SwiftでUIPickerViewを追加
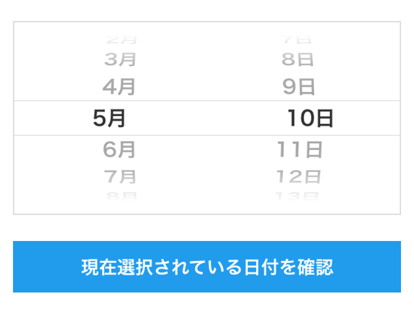
下の画像のように日付ピッカーと確認ボタンをつくる。

import UIKit

class SampleViewController: UIViewController, UIPickerViewDelegate, UIPickerViewDataSource {

    var monthArray:[String] = []
    var dayArray:[String] = []
    let timesPickerView = UIPickerView()

    override func viewDidLoad() {
        super.viewDidLoad()

        // UIPickerViewの1列目にセットするデータ
        monthArray = ["1月", "2月", "3月", "4月", "5月", "6月", "7月", "8月", "9月", "10月", "11月", "12月"]
        // UIPickerViewの2列目にセットするデータ
        dayArray = ["1日", "2日", "3日", "4日", "5日", "6日", "7日", "8日", "9日", "10日", "11日", "12日", "13日", "14日", "15日", "16日", "17日", "18日", "19日", "20日", "21日", "22日", "23日", "24日", "25日", "26日", "27日", "28日", "29日", "30日", "31日"]

        // UIPickerViewの配置
        timesPickerView.frame = CGRect(x: 10, y: 100, width: UIScreen.main.bounds.size.width-20, height: 150)
        // UIPickerViewの追加
        self.view.addSubview(timesPickerView)
        // timesPickerViewに枠をつける
        timesPickerView.layer.borderWidth = 1.0
        timesPickerView.layer.borderColor = UIColor(red: 0.86, green: 0.86, blue: 0.86, alpha: 1.0).cgColor

        // UIPickerViewのdelegate設定
        timesPickerView.delegate = self
        timesPickerView.dataSource = self

        // UIPickerViewの1列目の初期値を5月に設定
        timesPickerView.selectRow(4, inComponent: 0, animated: false)
        // UIPickerViewの2列目の初期値を10日に設定
        timesPickerView.selectRow(9, inComponent: 1, animated: false)

        // 確認用ボタンを生成
        let kakuninButton  = UIButton()
        kakuninButton.frame = CGRect(x: 10, y: 270, width: UIScreen.main.bounds.size.width-20, height: 40)
        kakuninButton.setTitle("現在選択されている日付を確認", for: UIControl.State.normal)
        kakuninButton.titleLabel!.font = UIFont(name: "HiraKakuProN-W6",size: 14)
        kakuninButton.setTitleColor(UIColor.white, for: UIControl.State.normal)
        kakuninButton.backgroundColor = UIColor(red: 0.13, green: 0.61, blue: 0.93, alpha: 1.0)
        kakuninButton.addTarget(self, action: #selector(tapKakuninButton(_:)), for: UIControl.Event.touchUpInside)
        self.view.addSubview(kakuninButton)
    }

    // UIViewPickerの列(横方向)数を指定
    func numberOfComponents(in pickerView: UIPickerView) -> Int {
        return 2
    }

    // UIViewPickerの行(縦方向)数を指定
    func pickerView(_ pickerView: UIPickerView, numberOfRowsInComponent component: Int) -> Int {
        switch component {
        //1列目の行数
        case 0:
            return monthArray.count
        //2列目の行数
        case 1:
            return dayArray.count
        default:
            return 0
        }
    }

    // UIViewPickerの幅のサイズを返すメソッド
    func pickerView(_ pickerView: UIPickerView, widthForComponent component:Int) -> CGFloat {
        switch component {
        //1列目の幅
        case 0:
            return (UIScreen.main.bounds.size.width-20)/2
        //2列目の幅
        case 1:
            return (UIScreen.main.bounds.size.width-20)/2
        default:
            return (UIScreen.main.bounds.size.width-20)/2
        }
    }

    // UIViewPickerのデータを返すメソッド
    func pickerView(_ pickerView: UIPickerView, viewForRow row: Int, forComponent component: Int, reusing view: UIView?) -> UIView
    {
        let pickerLabel = UILabel()
        pickerLabel.textAlignment = NSTextAlignment.center
        pickerLabel.font = UIFont(name: "HiraKakuProN-W6", size: 16)

        switch component {
        // 1列目のテキスト
        case 0:
            pickerLabel.text = monthArray[row]
        // 2列目のテキスト
        case 1:
            pickerLabel.text = dayArray[row]
        default:
            break
        }
        return pickerLabel
    }

    // UIViewPickerのrowが選択された時のメソッド
    func pickerView(_ pickerView: UIPickerView, didSelectRow row: Int, inComponent component: Int) {
        switch component {
        // 1列目が選択された時
        case 0:
            print("月の列に \(monthArray[row]) が選択された。")
        // 2列目が選択された時
        case 1:
            print("日の列に \(dayArray[row]) が選択された。")
        default:
            break
        }
    }

    // 確認ボタンが押された時に呼び出されるメソッド
    @objc func tapKakuninButton(_ sender:UIButton) {
        // 1列目の選択されているrowの取得
        let monthRow = timesPickerView.selectedRow(inComponent: 0)
        // 2列目の選択されているrowの取得
        let dayRow = timesPickerView.selectedRow(inComponent: 1)
        // 確認
        print("現在日付は、\(monthArray[monthRow])\(dayArray[dayRow]) が選択されています。")
    }

}
動作環境:Xcode10.0, Swift4.2


コメント
コメントはありません。